Self Registration
You can create the ability for new students/members to enter themselves and their contact information into your Charms account. However, we recommend that you only use this feature at specific times of the year and deactivate it when not in use.
HOW TO SETUP SELF REGISTRATION
When a student uses the self-registration process, their information will be placed in a group. The first step of the setup process will be to create a group for these people.
- Using the navigation panel on the left side of the screen
- Students
- Groups
- Enter the name you wish to call the group in the "Enter New Group Name" box (We recommend something like "New Registered Students")
- Press the "Create New Group" button
The next step in the setup process for self-registration is to turn on the self-registration feature.
- Using the navigation panel on the left side of the screen
- Settings
- Public/Direct Links
- Scroll down to “Self-Registration / Self Update”
- Select the group that you just created for self-registration from the dropdown list
- Select "Update Preferences" at the bottom of the page
HOW TO TURN OFF SELF REGISTRATION
When you wish to turn off the self-registration feature, it is as simple as going back to the settings option.
- Using the navigation panel on the left side of the screen
- Settings
- Public/Direct Links
- Scroll down to “Self-Registration / Self Update”
- From the dropdown menu, select "No Self Registration"
- Scroll to the bottom of the page and select "Update Preferences"
HOW DO STUDENTS USE SELF REGISTRATION
CAUTION: Students will be able to enter their OWN ID numbers during this process.
Copy the "Self-Registration / Self Update" quick link and email the quick link to your new students or place the quick link on your Facebook, Instagram, or web page


When the quick link is selected, they will see a screen that asks if they are a new or returning person.
- When the "New" option is selected, a screen with various fields to fill out will appear
- Any item with a RED OUTLINE indicates it is a REQUIRED FIELD
- All other fields are optional.
- When the "Returning Person" option is selected, a box will appear asking for the person's Charms password
- Then they will be taken to the "Update Personal Information" area.
- If the person does not know their Charms password, they will need to do a reset password or speak with a director for assistance
HOW TO APPROVE STUDENTS THAT HAVE SELF REGISTERED
Once your students have self-registered, you will need to go to the "Student" section and approve the "Student Sefl-Registrations" to complete the set-up process.
- Using the navigation panel on the left side of the screen
- Student
- Add Student
- Select the option for "Self Registered Students to be Approved"
All students who have self-registered will be listed here for you to approve


Approving Self Registered Students
When self registered student profiles have been approved in Charms, a tokenized URL is emailed to the student at the email attached to their student detail. This will allow the student to log in to Charms. The email will look like this.

- There are three scenarios that you may encounter
- Scenario 1: Everything was entered correctly with no errors
- In this instance click the "View" button
- A new window will open displaying all of the information that the student entered
- If everything looks correct, click the "Green Checkmark" and the student profile will be completed
If the information is not correct, click the "Red Trashcan". This will delete the entry and you can have the student re-enter it

- In this instance click the "View" button
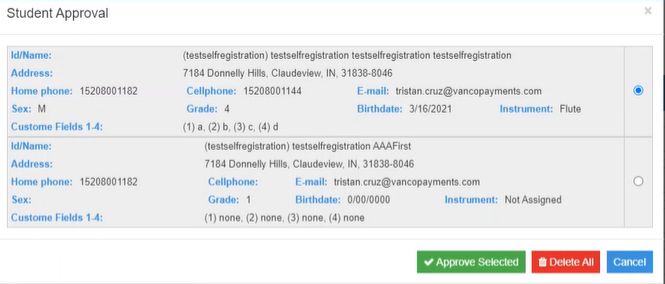
- Scenario 2: Two students have self-registered with the same Student ID
- In this instance click the "View" button
- A new window will open and display the two students in question
- Select the "Radio" button next to the student who should be registered with the Student ID#
- Select the "Green Approve Section" button
- This will create the student profile for the correct student
- The student that self-registered with the incorrect Student ID# will be deleted. That student will need to register again with their correct Student ID#
NOTE: If neither of the students has registered with a correct Student ID#, select the "Delete All" button and both entries will be deleted and both students will need to register with the correct Student ID#
- In this instance click the "View" button
- Scenario 3: A student has self-registered with a Student ID# that already exists in Charms
- In this instance click the "View" button
- A new window will open displaying the student in question
- When you try to approve the student, you will receive an error message alerting you to the fact the Student ID already exists and to have them re-enter their information with a unique Student ID#
- NOTE: Student ID#'s attached to inactive students may not be used by self-registering students. If a student is inactive and needs to be re-activated, please CLICK HERE for those instructions
- In this instance click the "View" button
- Scenario 1: Everything was entered correctly with no errors
